Now! Board

There are so many amazing technology tools available for use in education today. The problem is that there’s often no money available through school budgets. Often we have to look for cheaper options to provide the most engaging lessons possible for students.

One tool that has really changed the face of many classrooms is the interactive whiteboard. It allows for teachers to easily create interactive lessons that allows for students to easily share their learning with the rest of the classroom. From SMART boards, to Prometheans, to Enos, the interactive whiteboard has changed the way many of us teach. Ideally, every school would be outfitted with one of these in every classroom. Again, budgets just don’t lend themselves well to this. We have to search for cheaper alternatives. That’s where the now! Board comes into play. It creates the interactive whiteboard experience and even better than many of these others, it allows you to do so on any flat surface!

Learning Resources has created a tool that allows you to easily set up an interactive whiteboard almost anywhere in your classroom. And all the pieces literally fit into a very small bag. All you need to go along with it is a computer and a projector and you’ll be up and running in no time!


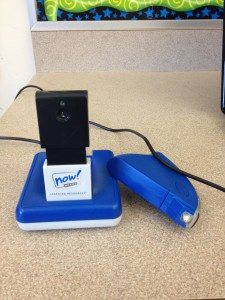
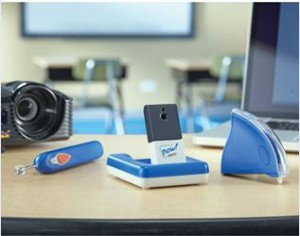
Upon opening up my now! Board package, I noticed how few contents there really were. It came with a small camera, a stylus, a wand and the software CD. After installing the software onto my laptop and reading a few instructions in the pamphlet, I knew anyone could have it up and running in just a few minutes.


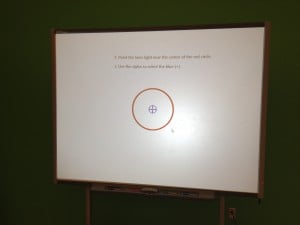
As long as your laptop is hooked up to a projector, you just need to hook in the camera through a USB port. When you open up the now! Board program, the camera will send out a red laser that helps you align everything, much like you would do with any other interactive whiteboard. You just have to align the laser with the center point and then use the stylus to touch 9 different buttons that pop up. After that, you’re good to go! Next time you open the software it will even ask if all the settings are still the same so that you don’t have to realign everything. After that, you’re good to go!


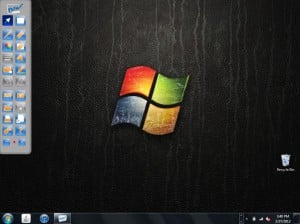
One of the first things I noticed was the dashboard that was really easy to navigate back and forth between all of the different tools. At the top it provided a button that would let you easily switch back and forth between a plain whiteboard background and your desktop. You can choose a pen tool which easily allows you to change color and size, a highlighter, and easily erase as well. You can also pull up a keyboard right on screen in case you’d like to type anything in. The stylus was relatively easy to use. It clicked very easily and to go from button to button, any student in any grade could work it pretty simply. It could sometimes be awkward due to the way that you have to hold your hand so that you don’t block the camera from the sensor though so that would have to be something they get used to. The junior wand also worked pretty well to navigate the dashboard. Click on the picture below to enlarge it and see all the different tools available.


Next I wanted to test out the whiteboard feature (even though it also works with any existing software on your computer). I stated by using the wand, which would seem to be the more natural fit for writing using the now! Board. I actually had a bit of difficulty with it. It wouldn’t write well when right against the surface, however it would when a few inches away from it. I eventually switched over to the stylus and found it to be much more effective. I had to be very deliberate with my writing in order to keep it pretty neat. I could see it working well for younger students while working with them on taking their time forming their letters. I think older students could also learn pretty quickly how to work it pretty well. It worked great when circling different objects or drawing lines between different things.


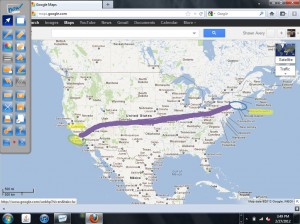
I eventually switched over to the internet to give it in both navigating and labeling. It was easy enough to switch back over to the arrow tool so I could pull up the internet. After bringing up the keyboard to try to type in Google Maps, I found that next time I’d just head back to the computer to type it in. Once it was up though, it was so simple to circle, highlight, and draw lines on the map. It’d be perfect in a social studies lesson such as labeling all the natural resources or landforms on a map.

My final test was to give it a shot on a number of different surfaces. As you can see from the pictures above, I began by giving it a shot right on my SMART board surface itself. Something like this would work perfect if you have something older that doesn’t work as well anymore. I found the surface to be smooth and easy to work with. My whiteboard also worked great and would probably be ideal for most classrooms. Again, having a smooth surface made the stylus very easy to use. I had a bit more difficulty on the wall. The way the walls are built in our school, it wasn’t completely smooth. Writing was a bit of a challenge as the styles would sometimes lose contact with the wall and I’d have to go back to where I had last finished off. If you had an extremely smooth wall, I feel you’d have much more success with it!

At a price point of $499, the now! Board is a much cheaper, much more mobile option than many of the alternatives. Being at a lower entry point into interactive whiteboards, it does have a few drawbacks as compared to some of the alternatives. However, if you’re looking for something extremely easy to get set up, something that’s compatible with any software but works well with it’s own whiteboard feature, and allows you to easily mark up anything on the internet, I recommend that you take a look at the now! Board. Just install the software, hook it up through the USB and you’re ready to get started!

Screencasting on a Budget


What is it?


Screencasting is a way to capture what’s happening on your computer screen while allowing you to narrate with your voice. It’s a tool that’s become popular on many sites such as Khan Academy and Learn Zillion. It’s an incredible way to record tutorials for your students or check for understanding by having them create their own!

Screencasting can become extremely expensive if you try to get all the best equipment. For example, Salman Khan uses as Wacom Bamboo tablet ($79+) and Camtasia Studio ($299). Of course, if you have the opportunity to purchase both, I highly recommend it! Many of us won’t have that option though so I’d like to provide you with some options on how to make screencasts for under $100.

If you already have an iPad in your class or will have one coming into your class, that is by far the cheapest option for screencasting. For $3.00 or less, there are a few great screencasting apps that you can use right on the iPad! My only recommendation if you purchase one of those would be to by a stylus to use with it.

Explain Everything would be one of my personal recommendations for an iPad screencasting app. It costs $2.99 in the iTunes store or if purchasing 20+ copies through the education store, they’re $1.50 per. Some of the reasons I love this app is because of the options to upload when you’re finished. You’re able to email it or save it to DropBox, YouTube, Evernote, or your camera roll. You’re also able to use multiple slides during your recording.


ScreenChomp is a free screencasting tool. Free is always great but that also usually means some limitations. With ScreenChomp, you can record audio as you draw. You can also add pictures in that you can annotate. However, when it comes to uploads, the only option is to save to the ScreenChomp site. From there you can use a link to connect to it. You do have the option to download which you can then upload to a video site.


Show Me is another free iPad app. It’s very similar to ScreenChomp. You can add images and can draw on it while you narrate. It’s perfect to share a math tutorial on. It’s great for a basic screencasting app. Again, there is no option to upload it directly to a site like YouTube though. It works great if you’re just looking for a link to share!


As great as iPads are and as much as I’m sure we wish we could all have them in the classroom, that’s just not a reality quite yet. If you’re one of the ones who don’t or even if you have iPads and want new ways to create screencasts in the classroom, there are other great options. In my class, we go the Salman Khan route but only on more of a budget. We use a a Bamboo Connect as our tablet which retails for $79.00 USD. The tablet is great! Not only can you use it for video tutorials but it’s an amazing tool for students to create digital are with. Then, instead of using Camtasia Studio, we use Jing. For $14.95 USD a year, Jing allows you to create screencasts of up to 5 minutes while being able to narrate all of it. Once finished, you can easily save it to your computer or upload to YouTube! The only downfall would be the aforementioned 5 minute limit. For longer tutorials, you may find yourself having to record numerous videos to get through all of it.

After you’ve purchased the basics to begin screencasting for your Mac or PC, you’ll need software to do you work in. The best part about this is that it’s easily found for free! If you do purchase a Bamboo tablet, it comes with software that includes Autodesk Sketchbook Express. This is my personal preference for software. Salman Khan uses SmoothDraw 3 which can be downloaded for free by clicking here. This is available for PC. If you have a Mac, you can use a program like GIMP. I don’t have a Mac but you can find tutorials on how to use both Sketchbook Express and SmoothDraw below.

Video Tutorials


In the videos below, I’ll walk you through how to use two different drawing programs to create video tutorials for your classroom. If you’re interested in Jing, TechSmith provides a great video tutorial on how to use it here.


Examples


Below you’ll find an example of a video tutorial I created with a Bamboo tablet, Sketchbook Express, and Jing. As you can see, I love Khan’s style of the dark background with the bright colors. It really makes everything stand out. If you’re working with pictures though, you may want a white background that the picture stands out against.


Application in Class


There are so many great options for screencasting. Again, I love to use it to create math tutorials or have students create them so that I can easily assess their understanding. You can also use it with pictures to explain science or social studies concepts. With writing, you could have students write a paragraph and explain what they’re doing as they write. They could explain what punctuation they’re using where and why. Or, you could always have students use it for things like showing how to comment on your class blog or how to navigate a website you use often in class! There are so many different options. Give it a try!

Resources and Links

  • Capture a Video with Jing
  • Screencasting How-To
  • Screencast-O-Matic – Free Screencasting
  • Screenr – Instant Screencasts

  • *How have you used screencasts for your classroom?*

    *Do you have any other great screencasting resources?*

    Voki: Free Customized Avatars


    What is it?


    Voki allows you to create your own customized avatar. You can change the appearance of the avatar, pick a background, and best of all, make it talk! You can add your voice by phone, microphone, or use text-to-speech to make it use a computerized voice. When finished, it’s easy to share a link to it or embed it on any site. It makes it so easy to use for both students and teachers!

    Voki provides you two different account options. You can register for a single user account for free or a classroom account for $29.95 USD a year. The nice part about Voki classroom is it’s much easier to add student accounts. Without it, you’ll have to add individual accounts, using a different email for each one, or have all students use one account name. The other nice part about the classroom account is that you can add recordings of up to 90 seconds as opposed to 60 seconds with a regular account. Either way, your students are guaranteed to love it!

    Video Tutorials


    Below, you’ll find video tutorials walking you through the Voki site. The first video will show you how to register for an account. The second video will share how to customize your avatar. The final video will finish up showing you how to customize your avatar as well as show you how to share your Vokis whether through email or embedding.


    Examples


    Application in Class


    Voki is a great classroom tool. If you keep a class blog, student blogs, a wiki, or have a different class site, you can welcome others with a little information about your class by having a Voki in your sidebar. To practice fluency, students could create a Voki and then read short stories or poems they’ve written. I’ve used it before to have students write Valentine’s Day poems and then recite and share in Vokis. You could have students research some of the animals or famous people that are in the Voki program. You could then have them present information through the Voki. You could have students use it to share results of a science experiment or important vocabulary in math. You could have students use it to create math problems that other students would have to listen to and attempt to solve while at a math center. There are so many amazing opportunities with Voki!

    Resources and Links

  • Voki Classroom
  • Voki Lesson Plans
  • Teach Web 2.0 – Voki
  • Slideshare – Voki

  • *What are some ways you’ve use Voki in the classroom?*


    *How could you incorporate Voki into a lesson?*

    Storybird: A Collaborative Storytelling Tool


    What is it?


    Storybird is a collaborative storytelling tool. Students use collections of art to be inspired to write stories. One the art is chosen, students are able to build there story by dragging and dropping pictures and creating a story to match. It’s great for teachers because they’re able to easily create student accounts and assignments for students. It’s also simple to collaborate with others whether it’s another student in class or someone from another country! Storybird is an extremely engaging site that allows students to focus more on the content of their writing rather than drawing pictures!

    Video Tutorials


    I’ll be sharing four different video tutorials with you. The first video will show you how to sign up for a teacher account on Storybird. With a teacher account, you can create student accounts (without needing an email for them), give students assignments, and easily view any stories your students have written. The second video will explain how to use Storybird. You’ll see how to choose a collection of art, how to add pictures to the story, how to write the story, and then how to publish. The third video will share with you how to collaborate using Storybird. You’ll find out how to invite someone else to write the story with you whether it be a classmate, friend, parent, or global connection. The final video will show you how to embed Storybird so you can share student work on your blog, wiki, or other website.


    Examples


    Below you’ll find a couple example Storybirds I’ve created. Being able to embed them into a blog, such as this, or other site allows for students to have an authentic audience to write for. As you’ll notice, you have the ability to make the Storybird full screen which really brings it to life. As for the iPad and other similar devices, the stories can be purchased to download for $1.99 (USD). This will allow you to download a PDF file of the story which can easily be opened in the iBook app, on a Nook Color, or any Android device. This adds a whole new element to sharing student work.


    Application in Class


    Storybird is excellent for many writing assignments. It’s an engaging site that will help bring even the most hesitant writers out of their shell. As I mentioned previously in one of the videos, Storybird can be used as a way to collaborate between parent and child. What better way to bridge home and school than by having a child and their parents take turn writing pages in a book. You could then have a Book Share day where parents come in and read the story with their child to the rest of the class.

    You could also find another class from another state or country to work with. Pair up students from the two classes and have them write a story together. Each child will bring their own style to the story while working together. Each class can work on them when they have an opportunity so the stories don’t have to be worked on at the exact same time. Once the stories are finished, Skype the other class and have students take turns reading stories. Each pair could read the pages they wrote from the book.

    Storybird can also just be used to have students write on their own. The fact that the work can stay unpublished until it is finished allows it to be worked on over several class periods. Students could all work on their stories during a computer lab, if you have a laptop cart, or are lucky enough to have a 1:1 classroom. It can also be done as independent work in a center if you have fewer computers. Either way, I highly recommend that you give Storybird a try!

    Resources and Links

  • New Teacher Challenge – Using Storybird
  • Examples of Storybirds – 2KM and 2KJ Blog
  • More Cool Tools – Storybird (2KM and 2KJ Class Blog)
  • A Collaborative Storybird Project
  • Collaborative Project Part 2

    *Have your students used Storybird before?*

    *Do you see your class being able to use this to collaborate with others?*

  • VoiceThread: A Collaborative, Multimedia Slideshow


    What is it?


    VoiceThread is a highly engaging, collaborative tool. It’s main feature is the ability to comment on different slides that have pictures, videos, or documents on them. It’s very easy to create identities for each student so that they can leave their own comments on different slides. The best part about it is that you only need a link or the embed code to easily share with others and if your VoiceThread is public, anyone can add comments!

    Video Tutorials


    Below you’ll find three video tutorials. The first will show you how to sign up for a free educator account. The educator account will allow you to create up to 50 VoiceThreads or 250 MB of storage. The second video will teach about the MyVoice dashboard, how to create a VoiceThread, and how to use the comment feature. The last tutorial will show you how to create, change, and use different identities for your students.


    Examples


    The example below is a VoiceThread that I created with my class to share descriptive writing. Each student had to write a paragraph about an emotion or feeling but they couldn’t use the exact word. This forced them to try to describe what they felt to convey emotion.


    After you’ve signed up for an account and have had an opportunity to play around with VoiceThread, come back here and add a comment to share either what you like about VoiceThread or how you plan to implement it in the classroom on the VT below!


    Application in Class


    VoiceThread has many great applications for the classroom. It can be used in every subject area from math to music. I’ve used it to have students practice inflection in speech. We’ve created a VoiceThread to share information about where we live. For math, you could have students create their own word problems and have other students comment with answers. You could share different art projects and have parents and students comment on one another’s work. You could have students do research projects on plants, animals, a continent, or country. They could find pictures and videos about their topic and then use a video or microphone comment to describe each slide. You could even collaborate with a class from another state or country by choosing a topic such as local weather and have different students share with comments. With VoiceThread, your possibilities are endless!

    Resources and Links


  • Edublogs Teacher Challenge – VoiceThread
  • Cool Tools for Schools
  • Example of a VoiceThread – Happy Father’s Day (2KM and 2KJ Class Blog)
  • Example of a VoiceThread – Happy Birthday Mrs. Yollis (Mr. Avery’s Blog)
  • VoiceThread 4 Education Wiki

  • *What type of projects have you used VoiceThread for?*

    *If you’ve never used VoiceThread before, how do you envision using it in the classroom?*