Homestyler: An Engaging Way to Teach Perimeter, Area and Volume


What is it?


Homestyler is a website that allows you to create floor plans for a home, add furniture, and decorations, and then share it in both 2D and 3D. The best part about the whole site is the ability to have the measurements showing so that you can have students design their own home and then find the perimeter, area, and even volume of each room or outdoor areas. The site is easy to use and provides a perfect opportunity to engage students while teaching these topics in math!

Video Tutorials


I’ll be sharing four different video tutorials with you. The first is just a basic introduction in how to sign up, how to navigate the site and how to start the layout of your house. The second will take you in to more depth to start to add on to your layout. It’ll teach you how to add windows, doors, and furniture. The third video continues showing you how to add on to your design, introducing paint color. The final video will show you how to save and share student work, whether through links or embedding.


Examples


Below you’ll find an example of a finished home created with Homestlyer. You may recognize it as being the same one that I used in the video tutorial. I scaled down the size of mine from 800 x 600 to 480 x 360. I also changed whether it could scroll from “no” to “yes.” So unless you have a wide space to share yours on your wiki or blog, you might also have to scale yours down as well! If you scroll down to the bottom, you’ll be able to see how to change the image from 2D to 3D, zoom in and out, and make the image full screen. Play around with it a little bit! You’ll also find a 360 degree panorama of the kitchen in my house that I was able to create using Homestyler!


Application in Class


Our goal as educators is to teach students in an engaging fashion that allows them to make connections between what they’re learning and the real world. This provides the perfect opportunity to do so! It takes minimal instruction to teach students how to use the site. They pick right up on it. Home building is something that all students are familiar with and can realize and understand how it connects to what they’re learning. You could even pull real estate ads that share things like square footage of the home. Allowing students to create and design their own home before finding the perimeter, area, and volume will allow them to take ownership of the project.

Once students are finished with their design, have them use the dimensions to find the perimeter and area of each room. You could even give a standard height for each room, say 8 feet, and have them find the volume if that fits into your curriculum as well! Students could enter the information onto a spreadsheet or on paper in class. Then you can easily share the work by embedding it into your site or printing it out for the students to have!

For younger students, you could even use it for basic shapes by having them create rooms that are different polygons. For older students, you could have them create yards that are in shapes like triangles and have them find the area of something like that. You could even teach students about similar and congruent shapes or proportions by having them create two or three houses that all have the proper relationship to one another.

If teaching descriptive writing, have students describe each of the rooms in their house in a way that would allow someone else to recreate it. You could even have a project where students create a house, describe it in as much detail as possible. They could then switch papers with another student who would have to try to recreate the house based upon the description they received. Be creative! The possibilities are endless!

Resources and Links

  • Homestyler Gallery – For Ideas
  • Homestyler Features

  • *How could you use Homestyler in your class?*

    *What other information would be helpful so you could use this program?*

    Kerpoof: All About Variety


    What is it?


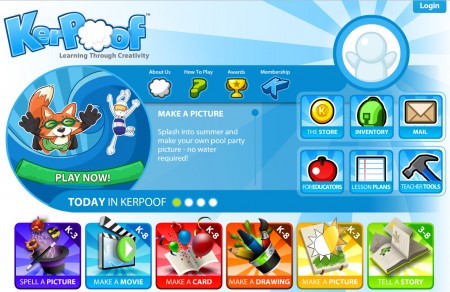
    Kerpoof is a captivating free site with a variety of different tools that can be used in the classroom. One of the great parts about Kerpoof is how it has different activities that cater to different age ranges so there are tools for the youngest of students as well as older students. Different tools include Spell a Picture, Make a Movie, Make a Card, Make a Drawing, Make a Picture, and Tell a Story. As students work and complete different tasks, they earn coins which they can use in the Kerpoof store to buy new items like paintbrushes for Make a Picture, backgrounds and animations for Make a Movie, or clothing for their avatar. This always keeps interest level extremely high!


    Spell a Picture is a feature designated for younger students or students who struggle with spelling. Students choose a background image. They then can either type in words or click on letters to create a word. Once a word is spelled correctly, images will appear with an arrow over them. Students can click that image to have it appear in their picture. For example, if students choose a space background, they can type in words such as star, sun, planet, or rocket. The appropriate pictures will have an arrow over them, allowing students to click and add them into the image.


    Make a Movie is one of my favorite features as it gets student creativity rolling. In this, students are able to easily create their own animated movie with scenes, music, and text. Students can add characters and objects with a simple click and drag. They can make them move, dance, and more by simply clicking an object, choosing an animation, and dragging it to the timeline. It’s a feature I highly recommend you check out!


    Make a Card is similar to the Make a Drawing feature where students are able to easily click and drag objects and words to the screen. They can add text and drawings. Once finished, it can easily be printed or saved as a jpeg file to share a nice message with someone else!


    Make a Drawing is a kid friendly paint option which allows students to easily draw objects which can then be saved as jpegs, saved to add into their animated movie, or printed. It easily allows students to add shapes which is great for the younger students. It’d also be a great place for students to draw pictures to go along with a story that they’ve written.


    Make a Picture allows students to choose a background and then drag images into it in a similar fashion to Spell a Picture. In this case, it gives more options for them to choose from. This could be used for younger students to create images to write about. It could also be another option for students who aren’t artistically skilled and would rather create a picture through here than Make a Drawing.


    Tell a Story is a Storybird like feature. It allows students to choose from backgrounds, images, add speech bubbles, and type in the text of the story. Much like all of Kerpoof’s other features. It’s very simple to use. Students can easily add more pages to their story, share it with a link once they are finished, print it, or download the pages they’ve created so that it can then be put into another program like PhotoStory or VoiceThread where they can narrate what they’ve done.


    Video Tutorials


    Below, you’ll find video tutorials that walk you through how to set up your own account as well as student accounts. You’ll also be able to see each of the different tools that Kerpoof offers in action. All of the videos can be distinguished by their title. The only one with hidden content is the final video which also shares how to use both the Make a Card and Make a Picture options.


    Application in Class


    Kerpoof can be used in a variety of ways in the classroom. The different tools open up so many different options that allow it to be accessed for any subject. In math, you could use the Make a Drawing feature to have students draw out word problems. You could use it for younger students to have them create arrays or fractions. You could use the Make a Story feature to have students actually create a math word problem using the different characters. You then could create a slideshow of all the created word problems and work on solving them together as a class. For English language arts, students could Make a Movie and write a story or script to go along with the movie. Younger students could use the Spell a Picture option to work on both spelling and typing skills. You could also have younger students use the Make a Picture option and teach them about using adjectives to describe what they created. For social studies, you could use the inventor story for Make a Story. Have them research the people who are on there and write a story about what they accomplished. You could also try to find a movie for Make a Movie that they could use to recreate a historical scene. In science, students could make a drawing that incorporates something they’ve been learning about. They could draw how photosynthesis works or what they saw occur in a science experiment. It could also be used to draw and label something like an animal cell. There are endless options for how you could use Kerpoof in the classroom.

    Resources and Links

  • Kerpoof lesson plans
  • Classroom Ideas
  • Video Overview
  • Kerpoof Review – ICT for Educators

  • *Have you used Kerpoof in the classroom before?*


    *What other ideas do you have for how it could be used in the classroom?*

    Storybird: A Collaborative Storytelling Tool


    What is it?


    Storybird is a collaborative storytelling tool. Students use collections of art to be inspired to write stories. One the art is chosen, students are able to build there story by dragging and dropping pictures and creating a story to match. It’s great for teachers because they’re able to easily create student accounts and assignments for students. It’s also simple to collaborate with others whether it’s another student in class or someone from another country! Storybird is an extremely engaging site that allows students to focus more on the content of their writing rather than drawing pictures!

    Video Tutorials


    I’ll be sharing four different video tutorials with you. The first video will show you how to sign up for a teacher account on Storybird. With a teacher account, you can create student accounts (without needing an email for them), give students assignments, and easily view any stories your students have written. The second video will explain how to use Storybird. You’ll see how to choose a collection of art, how to add pictures to the story, how to write the story, and then how to publish. The third video will share with you how to collaborate using Storybird. You’ll find out how to invite someone else to write the story with you whether it be a classmate, friend, parent, or global connection. The final video will show you how to embed Storybird so you can share student work on your blog, wiki, or other website.


    Examples


    Below you’ll find a couple example Storybirds I’ve created. Being able to embed them into a blog, such as this, or other site allows for students to have an authentic audience to write for. As you’ll notice, you have the ability to make the Storybird full screen which really brings it to life. As for the iPad and other similar devices, the stories can be purchased to download for $1.99 (USD). This will allow you to download a PDF file of the story which can easily be opened in the iBook app, on a Nook Color, or any Android device. This adds a whole new element to sharing student work.


    Application in Class


    Storybird is excellent for many writing assignments. It’s an engaging site that will help bring even the most hesitant writers out of their shell. As I mentioned previously in one of the videos, Storybird can be used as a way to collaborate between parent and child. What better way to bridge home and school than by having a child and their parents take turn writing pages in a book. You could then have a Book Share day where parents come in and read the story with their child to the rest of the class.

    You could also find another class from another state or country to work with. Pair up students from the two classes and have them write a story together. Each child will bring their own style to the story while working together. Each class can work on them when they have an opportunity so the stories don’t have to be worked on at the exact same time. Once the stories are finished, Skype the other class and have students take turns reading stories. Each pair could read the pages they wrote from the book.

    Storybird can also just be used to have students write on their own. The fact that the work can stay unpublished until it is finished allows it to be worked on over several class periods. Students could all work on their stories during a computer lab, if you have a laptop cart, or are lucky enough to have a 1:1 classroom. It can also be done as independent work in a center if you have fewer computers. Either way, I highly recommend that you give Storybird a try!

    Resources and Links

  • New Teacher Challenge – Using Storybird
  • Examples of Storybirds – 2KM and 2KJ Blog
  • More Cool Tools – Storybird (2KM and 2KJ Class Blog)
  • A Collaborative Storybird Project
  • Collaborative Project Part 2

    *Have your students used Storybird before?*

    *Do you see your class being able to use this to collaborate with others?*